Landscape Lighting Layouts for Walkways, Trees, and Pools
Darkness can turn a polished yard into a series of unseen edges, harsh shadows, and unused spaces. A thoughtful landscape lighting layout makes the property safer after sunset while giving paths, trees, and outdoor gathering areas a calm, welcoming glow.
For Southwest Florida homes, lighting also needs to hold up through rain, humidity, salt air, and year-round outdoor use. The strongest plans start with circulation and safety, then add focal points without flooding the yard with light.
Begin with the routes people use most, then build outward in layers.
Start With the Job Each Light Must Do
A lighting plan works best when every fixture has a reason to be there. Walkway lights help people see their footing. Tree lights reveal structure and depth. Pool-deck lighting helps guests move safely without turning the water into a mirror of glare.
List the places used after dusk: the front walk, side gate, lanai steps, driveway connection, seating area, grill path, and pool entry. Then mark obstacles such as roots, raised pavers, drainage swales, and low retaining walls.
Put safety before decoration
Changes in elevation deserve the first fixtures. Light every stair run, pool-deck transition, ramp, narrow side yard, and route between the house and trash area.
You don't need a bright source at every point. Instead, create overlapping pools of soft light so one fixture supports the next. This gives the eye time to adjust and keeps dark gaps from appearing between fixtures.
Choose a few focal points
After the travel paths are covered, select the features worth seeing at night. A mature oak, palm grouping, textured wall, fountain, or specimen planting bed can anchor the view from indoors.
Keep the number of focal points limited. When every feature gets a spotlight, none of them feels special. A restrained plan looks more expensive because the eye has room to rest.
Build a Landscape Lighting Layout on Paper First
Measure the hardscape before buying fixtures. Note the width and length of walkways, deck edges, steps, planting beds, tree trunks, and the distance to the transformer location.
A simple scaled sketch can prevent expensive revisions. Draw doors, gates, pool equipment, irrigation heads, existing outlets, drainage lines, and planned planting beds. Add fixture symbols and cable routes before digging.
These are useful starting ranges, not fixed installation rules. Fixture output, beam spread, soil conditions, vegetation, and local electrical requirements all affect final placement.
| Area | Starting Placement Range | Primary Goal |
|---|---|---|
| Walkway path lights | 8 to 14 feet apart, staggered | Reveal edges without glare |
| Path-light offset | 12 to 18 inches from the edge | Keep fixtures out of foot traffic |
| Tree uplights | 2 to 5 feet from the trunk | Match the beam to canopy size |
| Pool-deck fixtures | Set by a qualified electrician | Maintain safe circulation near water |
A yard often needs separate lighting zones for the front entry, backyard, pool area, and feature trees. That arrangement gives you more control than one oversized circuit.
For local budgeting and equipment choices, this landscape lighting fixture and transformer guide helps explain how fixture types and transformer capacity affect a project.
Design a Safe, Welcoming Walkway
Walkways are the backbone of a landscape lighting layout because they connect the house to the rest of the property. The goal is clear footing, not a line of glowing caps that resembles an airport runway.
Stagger path lights instead of lining them up
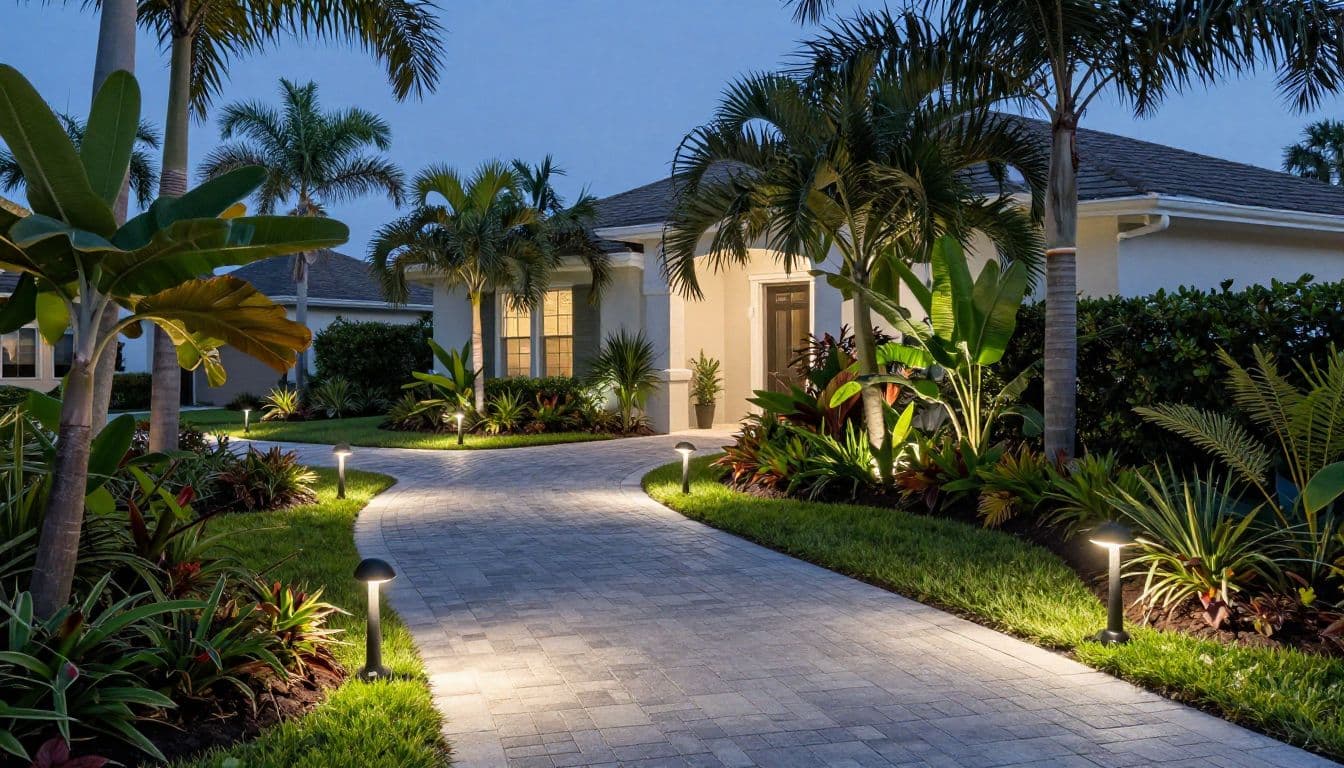
Place path lights on alternating sides of a walk rather than directly opposite each other. Start with 8 to 14 feet between fixtures, then adjust after dark. Curves, narrow paths, and taller fixtures may need closer spacing.
Set fixtures roughly 12 to 18 inches off the walk's edge. This protects them from shoes, mowers, and paver repairs while directing light across the surface. Aim for light that shows the border of the path, not the lamp itself.
Low-profile fixtures with a shielded cap work well beside pavers, concrete, shellstone, and mulch beds. Keep their light below eye level when approaching the house.
Treat steps and turns as separate zones
A path light near a stairway rarely gives enough definition to each tread. Use integrated step lights on a riser, retaining wall, or nearby side wall where the fixture can throw light across the step.
At gates and sharp corners, add a softly shielded fixture before the turn. Avoid mounting a bright light directly across from the approach. Guests shouldn't have to look into the source to find the latch or see a drop-off.
A brighter lamp doesn't fix an underlit walkway. It often creates glare that hides the edge of the pavement.
Use Tree Lighting to Add Depth, Not Hot Spots
Trees give a flat yard a sense of height at night. However, each species needs a different approach. A wide live oak, a slender palm, and a dense clusia hedge won't respond to the same fixture or beam angle.
Uplight trunks and canopies with care
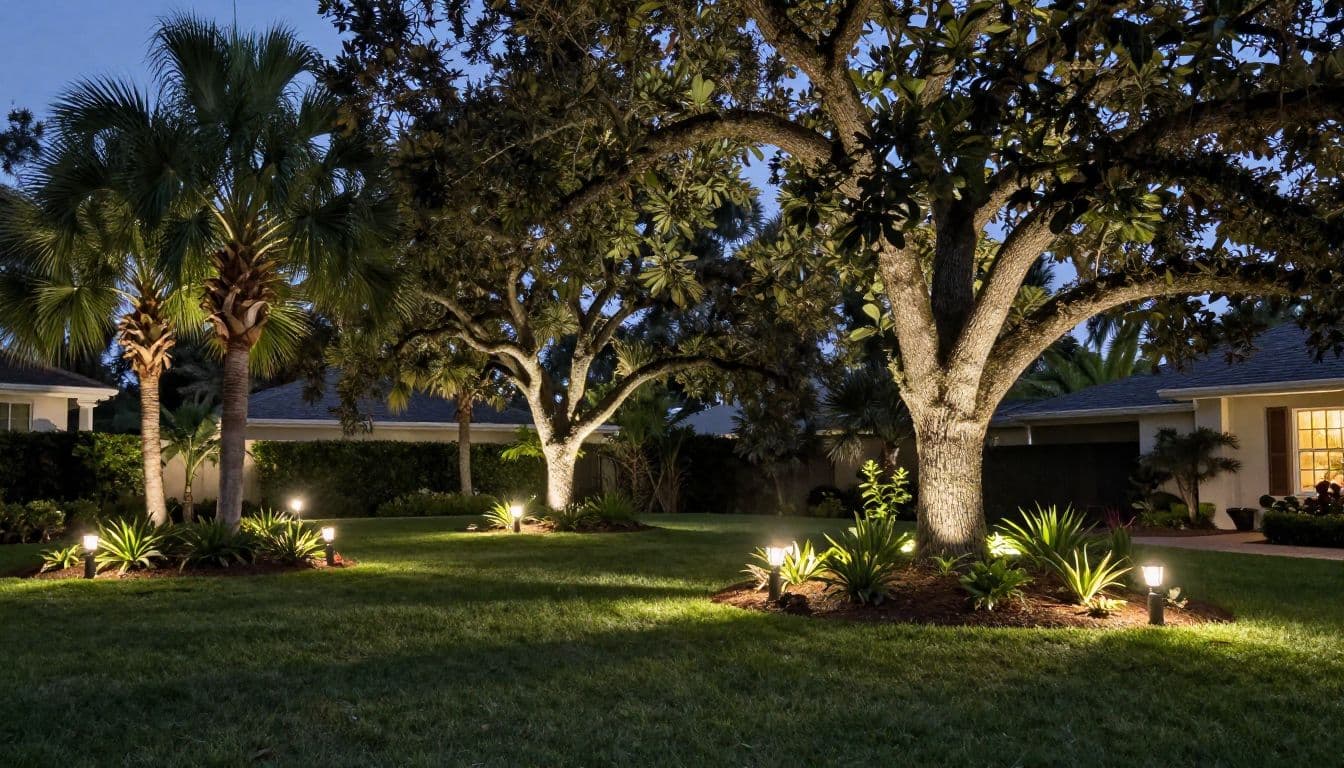
For a palm, a narrow-beam uplight placed a few feet from the trunk can draw the eye upward without blasting the fronds. Position the fixture so the beam finishes within the canopy rather than spilling into a neighboring window.
Broad-canopy trees often look better with two lower-output uplights set at different angles. One can reveal the trunk and major limbs. The other can soften the outer canopy. Test placement at night before burying cable because branches and leaves change the beam.
Avoid placing a fixture where a mower can strike it or where runoff will bury the lens in mulch.
Use downlighting for softer ground light
Downlighting, often called moonlighting, puts a shielded fixture high in a sturdy branch or structure. It casts dappled light onto the ground and can cover a seating area or side path with less glare than several path lights.
A qualified installer should secure the fixture, protect the cable, and leave room for tree growth. Palm fronds also move in wind, so avoid relying on a high fixture as the only light near steps or a gate.
In a balanced landscape lighting layout, uplighting creates form while downlighting makes the surrounding ground easier to use.
Plan Pool-Deck Lighting Around Safety and Reflection
Pool lighting needs a lighter touch than a front entry. Water reflects bright points, so a fixture that feels fine beside a driveway can become distracting when it shines across a pool surface.
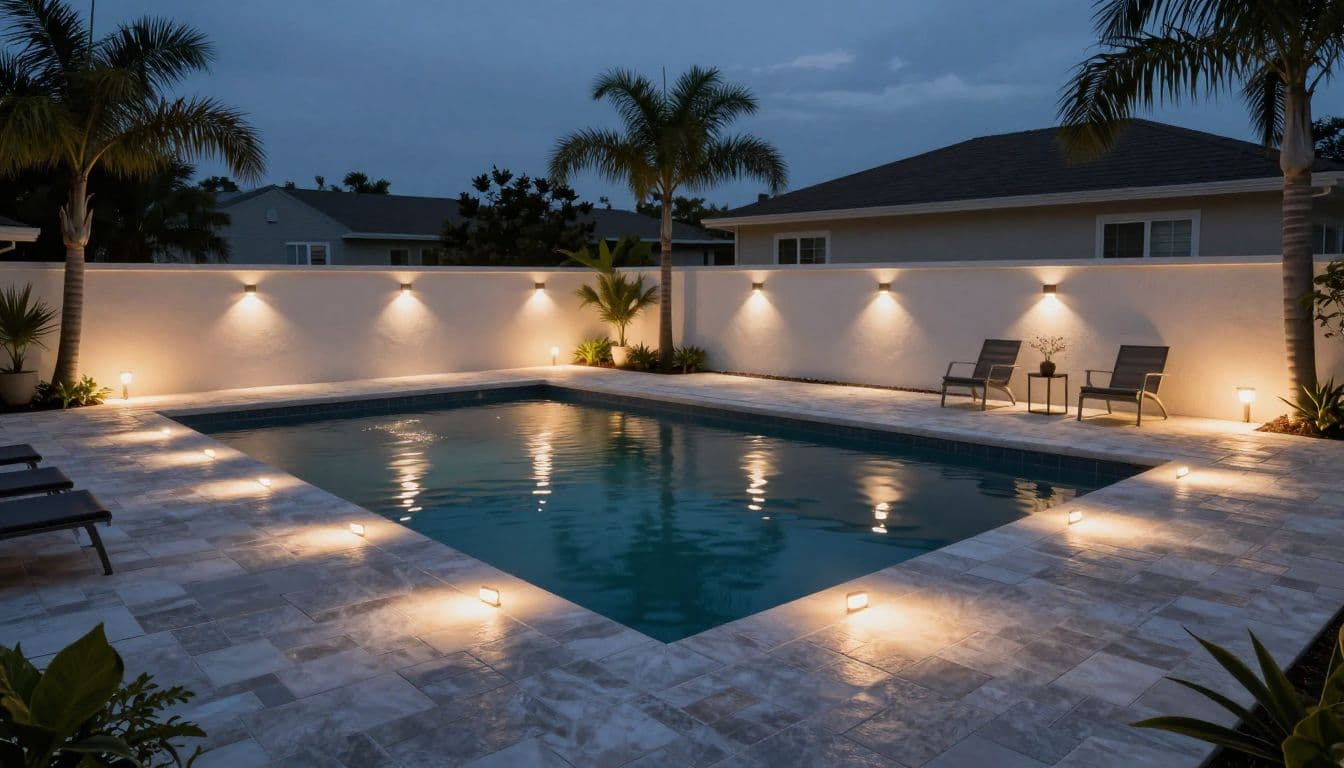
Light circulation routes around the water
Focus on the paths people take from the home to the pool, outdoor shower, seating area, and equipment gate. Light steps, deck-level changes, and corners near furniture. Low wall lights and carefully placed path lights often give more useful coverage than high-output spotlights.
Keep fixtures outside the main lounging zone when possible. A light hidden behind a planter, bench, or low wall can wash the deck surface without shining into someone's face.
Aim lights away from the water. A soft wall wash or nearby planting-bed glow creates enough orientation while preserving the calm look of the pool.
Bring in a qualified electrician early
Pool-related electrical work needs more than a standard low-voltage plan. A qualified electrician should review fixture locations, power sources, bonding, GFCI protection, equipment connections, and required clearances before installation begins.
Local code requirements and the National Electrical Code govern work around pools and spas. Don't guess at distances or modify electrical equipment after the fact. The lighting installer and electrician should coordinate the design before cable routes are finalized.
Deck material also affects where fixtures can sit and how water drains. This paver pool deck versus concrete pool deck comparison can help when you're planning a new surface along with outdoor lighting.
Select Warm Fixtures With Useful Beam Control
Color temperature shapes the whole mood of a yard. For most homes, 2700K warm white gives trees, stone, stucco, and pavers a natural evening tone. It also feels more comfortable beside seating areas and pool decks.
A 3000K fixture can suit modern architecture or cooler gray hardscape. Higher color temperatures often look stark against warm Florida planting and can make a patio feel commercial.
Match the beam to the feature
Narrow beams work for tall palms, columns, and slim architectural details. Wider beams suit oaks, broad hedges, and retaining walls. A fixture with an adjustable shroud or glare guard gives more control when a planting bed changes over time.
Don't solve a coverage problem by installing a stronger lamp. First, adjust the fixture's location, beam width, height, or aiming angle. Several small sources usually look better than one harsh floodlight.
Choose materials that handle the weather
Solid brass and copper fixtures weather well outdoors and develop a natural patina. Quality powder-coated aluminum can also work when it is rated for wet locations and properly maintained.
Skip thin fixtures with exposed plastic lenses or weak stakes. Southwest Florida's sun, rain, irrigation spray, and salty air can shorten their service life. Replaceable LED components and durable sockets make future repairs easier.
Size the Transformer and Cable for the Real Load
Low-voltage systems usually run on a transformer that reduces household current for outdoor fixtures. The transformer still needs correct sizing, weather protection, and a properly supplied outlet.
Add the actual wattage of every planned fixture, then leave capacity for future additions. Avoid loading a transformer to its maximum listed rating. A larger model with spare room is often easier to expand than a system that begins at capacity.
Account for voltage drop on long runs
As cable runs get longer, fixtures near the end can appear dimmer. Cable gauge, fixture wattage, and wiring method all affect voltage drop. A professional may use multiple home runs, split zones, or heavier cable to keep output consistent.
Don't hide splices where future repairs will require tearing up a finished bed or deck. Use listed direct-burial connectors and place them where technicians can locate and service them.
Put controls where they'll be used
Astronomical timers turn lights on at dusk and off on a schedule that changes with the season. Many systems also offer zone controls through an app, but a simple timer and manual override remain useful.
Set the front entry to run later than a decorative tree zone if the family spends evenings outside. That approach reduces unnecessary light and extends fixture life.
Keep the Night Sky and Neighbors in Mind
Outdoor lighting should point downward or toward a defined feature. Shielded caps, cowls, and carefully aimed spotlights reduce glare, light trespass, and wasted energy.
Aiming matters as much as fixture selection. After installation, walk the property from the driveway, sidewalk, bedrooms, and neighboring sight lines. Adjust any fixture that exposes the bulb or throws light above the roofline.
Use timers to avoid all-night lighting
Front paths may need light until late evening, while backyard accent lights can turn off sooner. Timers give the property a finished look without keeping every fixture on until morning.
Motion-activated lights can work at side gates or service areas. Choose a model with a warm, low-glare output so it doesn't overwhelm nearby decorative lighting when it activates.
Coordinate Lighting With Hardscape and Planting Work
Lighting is easiest to install before the final surface and planting finishes go in. Cable routes, sleeves, and fixture bases should be part of the construction plan, not an afterthought.
Plan around concrete, pavers, and turf
If a concrete company will pour a new walkway, patio, or driveway extension, finalize lighting routes first. Sleeves beneath the planned slab let cable cross without future cutting or surface damage.
The same timing matters for paver work. Install and test cable before final joint sand, edging, and planting. If the project includes artificial turf, place wiring and fixture bases before final grading and turf installation.
For larger projects, the right sequence for a backyard renovation can help you coordinate hardscape, planting, drainage, and lighting without repeating work.
Maintain the system as the yard grows
Check fixtures every few months for mulch buildup, shifted stakes, cloudy lenses, and branches that block light. Trim plants before they cover path lights or press against hot fixture housings.
Schedule paver cleaning after the lights are installed and tested. Pressure washing can dislodge joint sand, bury connectors, or move loose fixtures if the crew works around an unfinished system. Afterward, re-aim the lights because a clean deck often reveals glare that was less obvious before.
Create a Yard That Feels Finished After Sunset
A strong landscape lighting layout leads people safely through the property, gives trees dimension, and lets the pool deck remain usable without harsh glare. Warm, shielded fixtures and staggered placement create the most natural result.
Start with the routes people walk, then add trees and outdoor living areas in measured layers. When water, concrete, pavers, or new planting are involved, coordinate the work early and bring in qualified electrical help where it belongs.