

Landscape Lighting Installation Cost in Cape Coral, Fixture Types, Transformer Sizing, and Typical Layouts
Ever notice how a home can look “finished” at noon, then disappear after sunset? In Cape Coral, low-voltage LED landscape lighting is one of the few upgrades that improves curb appeal, safety, and how you use the yard at night.
This guide breaks down real-world cape coral landscape lighting cost ranges, what fixtures make sense near salt air, how to size a 12V transformer (with a step-by-step example), and simple layouts that help avoid voltage drop. If you’re weighing DIY vs hiring a pro, you’ll be able to compare apples to apples.
Cape Coral landscape lighting cost: DIY vs hiring a pro (with clear assumptions)
Assumptions for the numbers below: LED fixtures, a 12V low-voltage system, direct-bury cable, and a basic timer/photocell on the transformer. Pricing swings based on access, bed rock, long wire runs (common on waterfront lots), and fixture quality.
Typical professional installation in Cape Coral: about $2,000 to $6,000 for many homes, with higher totals for larger properties or premium brass/copper fixtures. National cost roundups can help you sanity-check ranges, like LawnStarter’s 2026 landscape lighting cost overview and HomeAdvisor’s outdoor lighting installation cost ranges.
DIY (material-only) ballparks: $400 to $2,000 for many starter systems, depending on fixture count and whether you choose plastic, aluminum, or brass. DIY can work well if you’re handy and your runs are short, but mistakes show up at night: dim fixtures at the end, flicker from bad splices, or water in connectors.
Pro install ballparks (labor included): many contractors effectively land around $200 to $450 per light installed when you include the transformer, wire, and setup time. That’s why “just adding two lights” can still cost real money.
If you’re already doing larger landscaping upgrades, it’s smart to plan lighting early so wire paths don’t fight new edging, mulch, or plant roots. A bundled site visit can also align lighting with hardscape plans on the same Outdoor Life Pros services page.
Fixture types that make sense in coastal Cape Coral (and what to avoid)
Cape Coral’s combo of humidity, irrigation spray, and salt air is like leaving metal tools outside all year. Some fixtures survive it, some don’t.
Common low-voltage fixture types (and where they work)
- Path lights: Best for walks, driveway edges, and gates. Keep the light low and aimed down so it guides, not blinds.
- Uplights and spotlights: Used on palms, feature trees, columns, and textured walls. Great for depth, but easy to overdo.
- Wall-wash lights: Even “sheet” of light across a façade, often used between windows or on stone.
- Step and hardscape lights: For lanai steps, pool deck transitions, and seat walls. These are safety lights first.
Coastal durability checklist (materials and ratings)
- Brass or copper fixtures: Usually the longest-lasting choice near salt air, and they age better.
- Stainless hardware: Look for stainless screws and brackets so you’re not chasing rust stains on stucco.
- Avoid thin aluminum (cheap sets): Aluminum can corrode fast if the finish gets nicked.
- IP ratings: For exposed areas, many homeowners aim for IP65 or higher (dust-tight and water-jet resistant) and prefer higher protection for in-ground or heavy spray zones. For a deeper explanation of coastal materials and IP ratings, see this coastal fixture selection guide.
One more planning tip: if a concrete company is scheduled for a new walk, patio, or driveway, finalize lighting routes first so sleeves or conduit can be placed before the pour. If you’re coordinating hard surfaces, start with a contractor who does site prep and grading like a Cape Coral concrete contractor.
Transformer sizing (12V): a simple step-by-step example homeowners can copy
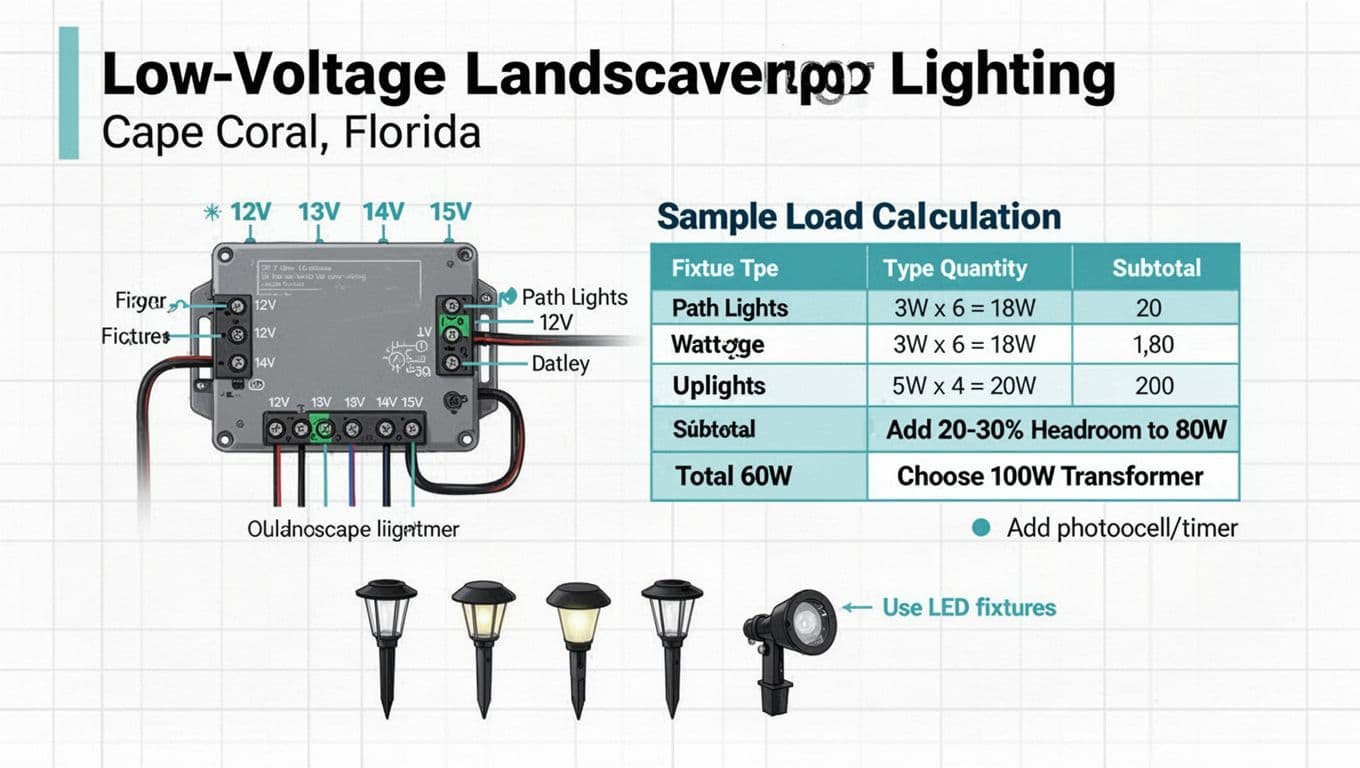 Illustration of a multi-tap 12V transformer and a basic load calculation example, created with AI.
Think of the transformer like the heart of the system. Too small, and everything struggles. Too big is fine, but you still need good wiring.
Step-by-step sizing example (LED, 12V)
Let’s say you want:
- 8 path lights at 3W each
- 4 uplights at 6W each
- 2 step lights at 2W each
-
Add up the wattage per group
Path lights: 8 × 3W = 24W
Uplights: 4 × 6W = 24W
Step lights: 2 × 2W = 4W -
Find the total connected load
24W + 24W + 4W = 52W -
Add headroom for reliability and future adds
A common target is 20 to 30% spare capacity .
52W × 1.25 = 65W (rounded) -
Choose the transformer size
Pick the next standard size up, like 100W . You’ll run cooler, and you have room for a couple more fixtures later. -
Plan zones (multiple runs)
Instead of one long run, split loads into two or three runs so voltage stays steadier.
For more detail on the math and why headroom matters, this guide on calculating transformer size for landscape lighting is a helpful reference.
Code-aware notes (not legal advice): Use a listed low-voltage transformer, plug it into a GFCI-protected receptacle, follow burial and protection guidance for cable, and use waterproof, gel-filled connectors rated for direct burial. Also check Cape Coral permitting rules and HOA lighting rules, especially for front-yard changes.
Typical layouts that avoid voltage drop (plus 3 “real” project budgets)
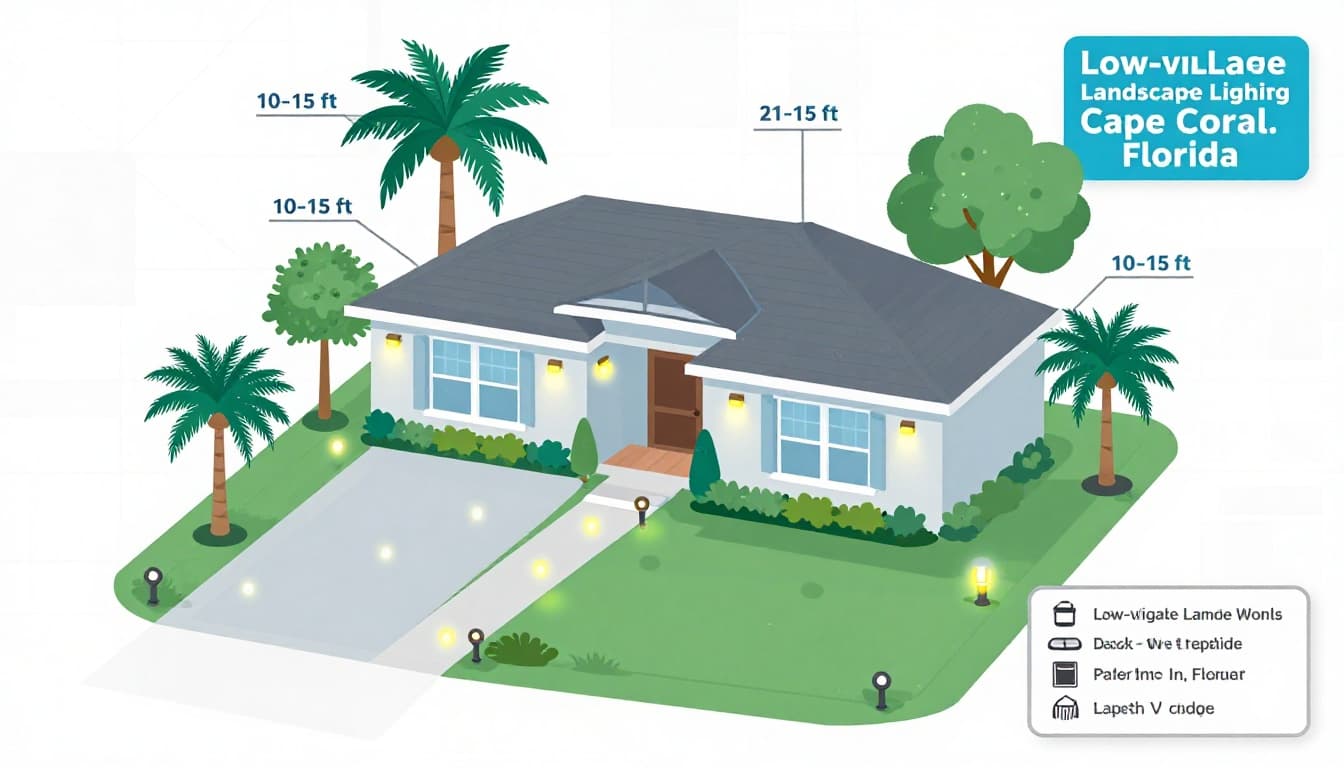 Example placement plan for a Cape Coral home with common fixture spacing, created with AI.
A voltage-drop-friendly layout is like watering a garden with a short hose instead of a 200-foot one. The longer the run and the more watts you pile on, the more the far end suffers.
A simple layout recommendation that works on many Cape Coral lots
- Keep each run shorter rather than chaining everything end-to-end.
- Split the yard into 2 to 4 separate cable runs (front walk, driveway/house wash, palms, lanai/patio).
- Use 12/2 cable for most runs, and consider 10/2 for longer reaches.
- Put higher-load fixtures (uplights) closer to the transformer, or give them their own run.
- If your transformer has multiple taps (12V to 15V), use a higher tap for longer runs so end fixtures don’t look tired.
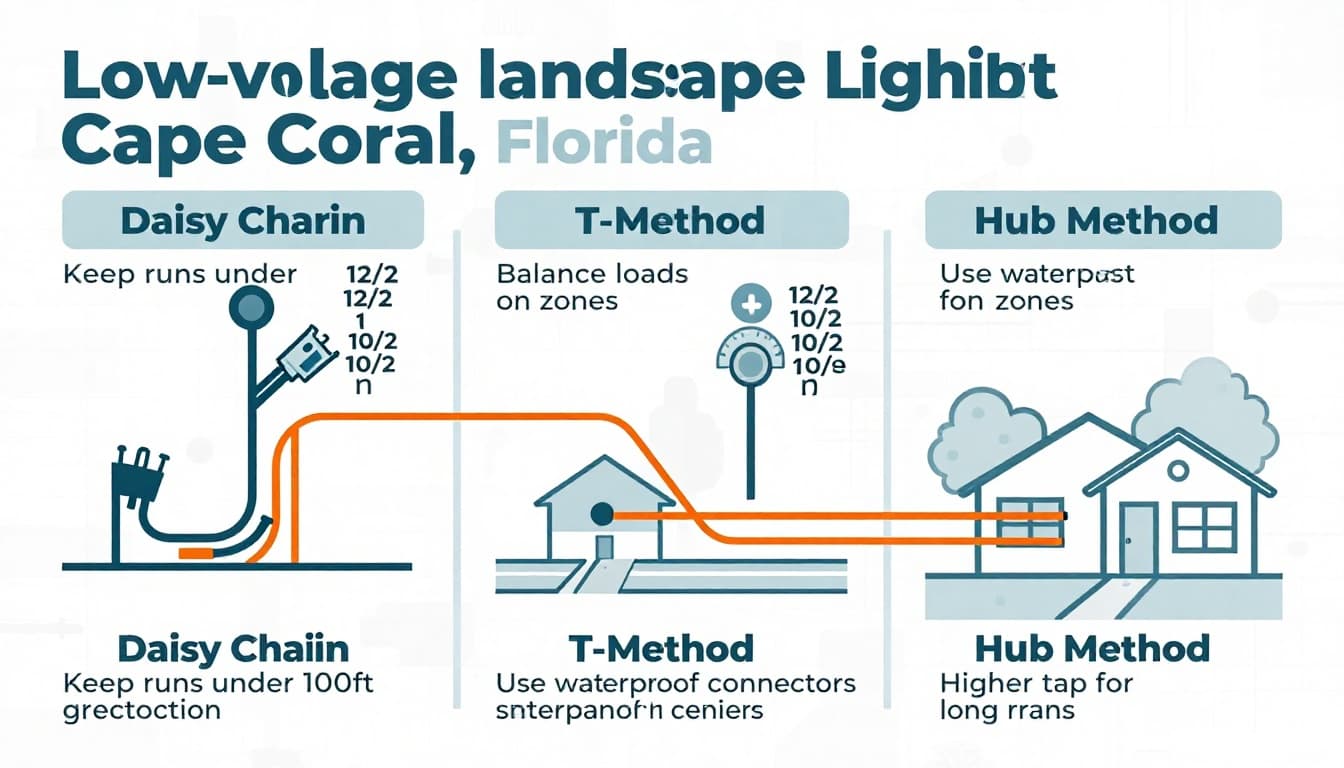 Comparison of common wiring topologies that reduce dimming on longer runs, created with AI.
Three typical projects with itemized ballpark costs (installed)
Project A: Front walkway + entry (starter curb appeal)
| Item | Ballpark cost |
|---|---|
| 6 LED path lights | $240 to $600 |
| 1 transformer (100W) w timer/photocell | $150 to $300 |
| 100 to 150 ft wire + connectors | $90 to $180 |
| Labor (layout, trench, connections, aiming) | $700 to $1,400 |
| Estimated total | $1,180 to $2,480 |
Project B: Walkway + 4 palm uplights (most common “wow” upgrade)
| Item | Ballpark cost |
|---|---|
| 8 fixtures (mix path + uplights) | $400 to $1,200 |
| Transformer (150W to 200W) | $200 to $450 |
| 200 to 300 ft wire + connectors | $160 to $320 |
| Labor | $1,200 to $2,500 |
| Estimated total | $1,960 to $4,470 |
Project C: Full front plus lanai steps (bigger layout, more wire)
| Item | Ballpark cost |
|---|---|
| 12 to 16 fixtures (path, wash, uplight, step) | $800 to $2,800 |
| Transformer (300W) or two smaller units | $350 to $900 |
| 400 to 600 ft wire + connectors | $300 to $650 |
| Labor | $2,000 to $4,200 |
| Estimated total | $3,450 to $8,550 |
If your plan also includes new plant beds, fresh mulch, or replacing patchy areas with artifical turf , bundle the work so wires can be placed before final grading and ground cover. For turf options and prep, see sod and artificial grass installation in Cape Coral. If you’re washing and sealing hardscape, schedule paver cleaning after the lighting is installed and tested, so you do not bury splices under fresh sand or washouts.
Quote-request checklist (so bids are comparable)
Bring this list when you request pricing:
- Fixture count, fixture type, and material (brass, copper, aluminum)
- LED wattage per fixture and color temperature preference
- Transformer brand, wattage, and whether it has multi-tap outputs
- Wiring plan (number of runs, approximate footage, 12/2 vs 10/2)
- Connector type (waterproof direct-bury) and burial approach
- Controls (timer, photocell, smart add-on) and GFCI power source
- Warranty terms, and what’s covered (fixtures, LEDs, labor)
- HOA rules and whether permits apply for your neighborhood
Lighting should make your home feel easier to live in after dark, not become another maintenance chore. Get the layout right, choose corrosion-resistant fixtures, and size the transformer with room to breathe, and your system will look consistent for years. If you want help tying lighting into a bigger outdoor plan, especially when concrete and planting work overlap, ask for a design that treats the yard as one connected project, not scattered add-ons.