


How to Inspect Oleander Caterpillar Damage in Southwest Florida
To investigate possible oleander caterpillar damage, look closely at the foliage and record any missing leaf tissue, dark specks, and caterpillars you can see. The clearest inspection covers the whole shrub, not just the branch that first caught your eye.
A few damaged leaves tell you less than a pattern of changes across the plant. Start with the foliage, then work outward through your landscaping to see how much of the planting is affected.
Look Closely at Changes on Oleander Leaves
Begin with the leaves that look different from the rest of the shrub. Missing pieces, thin areas, and exposed veins are easier to assess when you compare them with nearby leaves that remain intact.
Note Missing Leaf Tissue
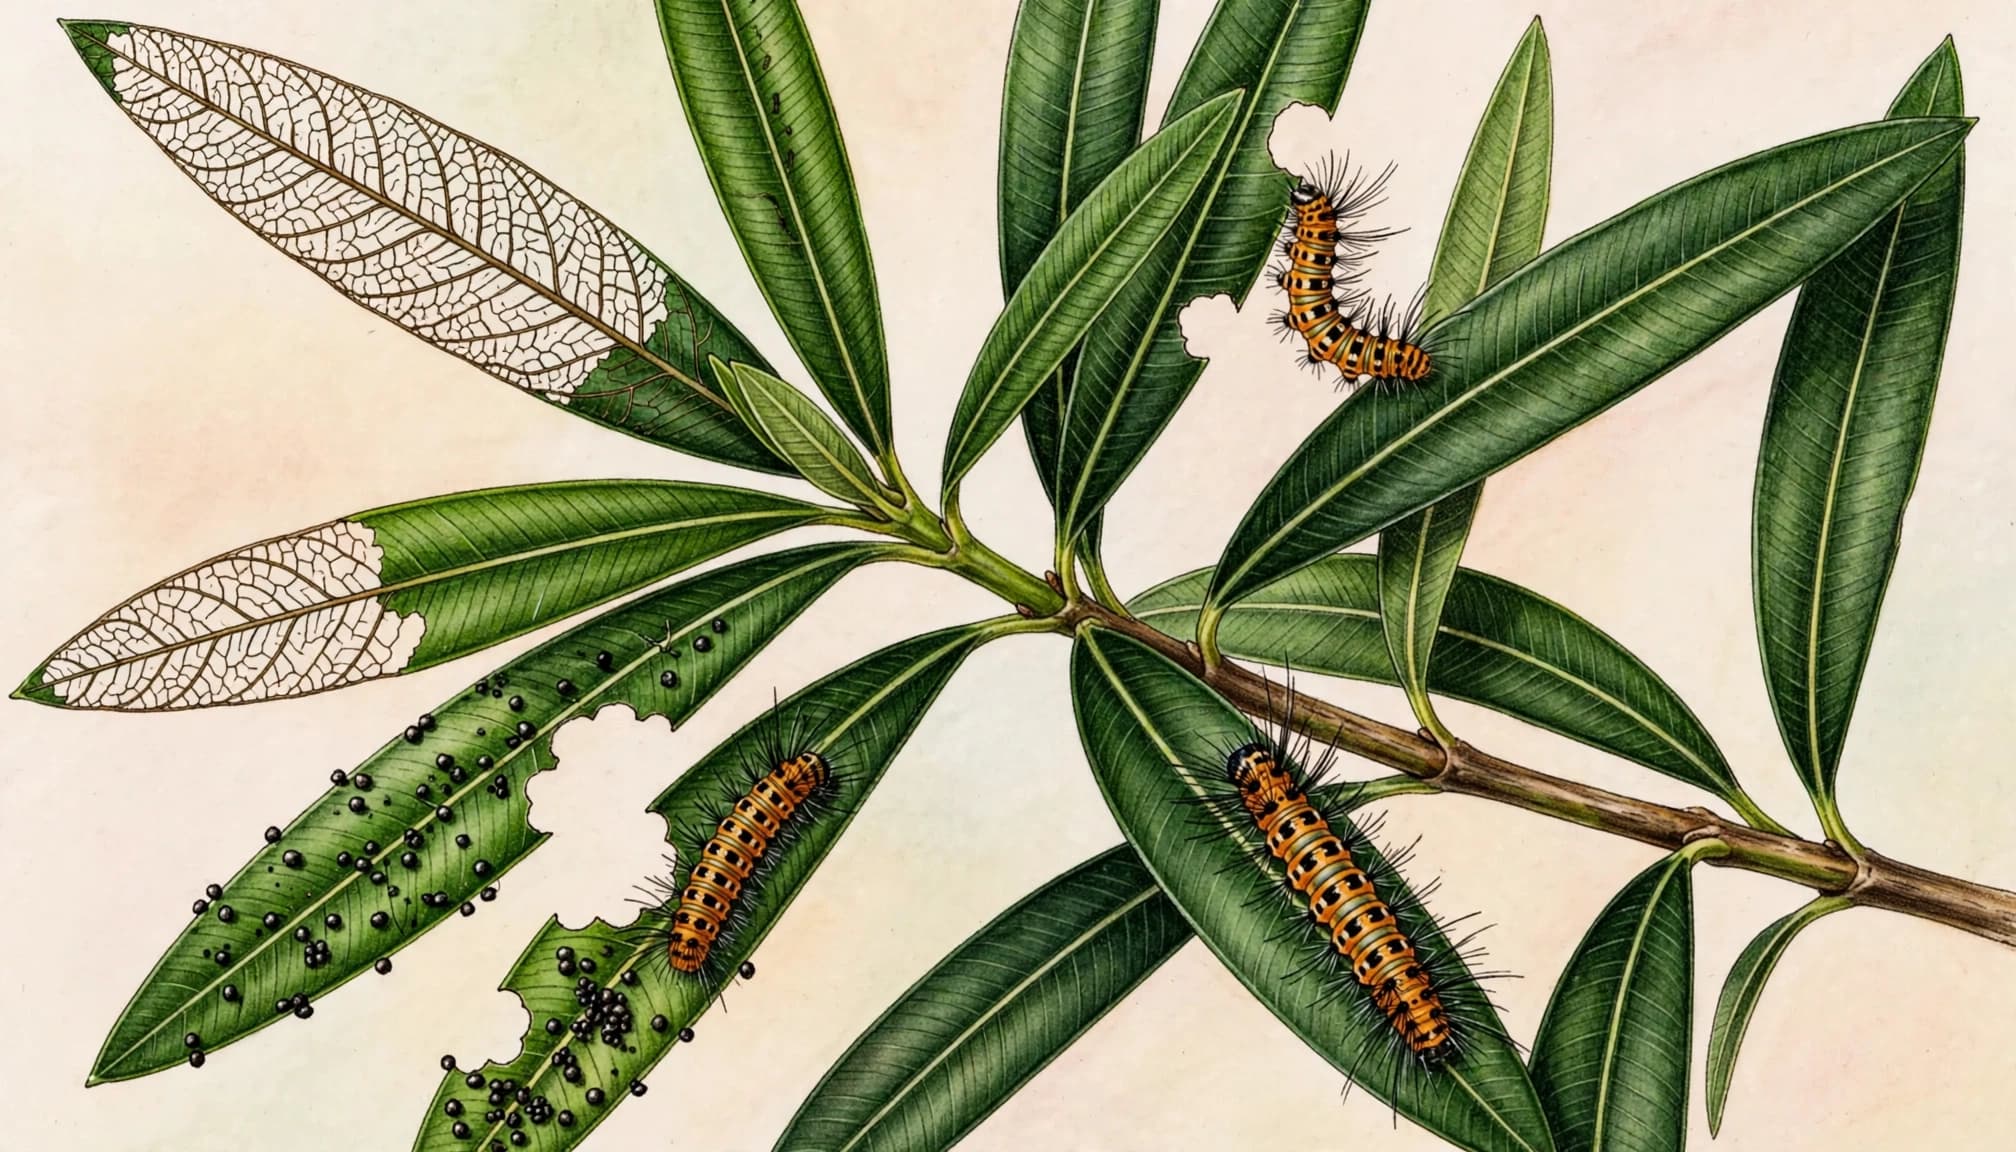
Look along the edges and tips of the leaves. Note whether small sections are missing or whether most of a leaf has disappeared. On a damaged branch, compare several leaves rather than relying on a single ragged edge.
Also look for holes within the leaf surface. Their size and position can help you describe what you found, especially if you take a close photo alongside a wider view of the branch.
Look for Thin Areas and Exposed Veins
A leaf can have a thin, patchy surface while much of its outline remains. In other areas, you may see veins with little tissue between them. This exposed framework is often described as skeletonization.
Record where those leaves occur and how many you can see. A few affected leaves on one stem call for a different assessment than a similar pattern across an entire hedge.
Inspect the Undersides and Interior of the Shrub
An oleander can look full from the sidewalk while damage remains hidden inside the canopy. Walk around the plant and inspect it at several heights, including the side facing a wall, fence, or neighboring shrub.
Turn Your Attention to Lower Leaf Surfaces
Look at both sides of leaves near damaged areas. The undersides can be difficult to see when foliage overlaps, so take your time and use a flashlight if the interior is shaded.
Check leaves that appear intact as well as those with missing tissue. A wider inspection helps you record where visible insects or specks occur, rather than limiting your notes to the most damaged branch.
Follow the Branches Toward the Center
Trace affected stems inward and look at the foliage around them. Notice whether damage is concentrated at the outer tips or appears deeper in the plant.
For a long hedge, inspect several shrubs or sections separately. A continuous row can hide differences between plants, particularly where branches overlap.
Record Caterpillars and Dark Specks on the Foliage
When you see a caterpillar, note its position on the leaf or stem and take a clear photo. If several are visible, record whether they are together on one branch or spread across the shrub.
Also look for small dark specks on leaves and surfaces below the plant. These may be frass, the term for insect droppings, but their presence alone doesn't establish which insect is involved.
Compare What You Can See
Photograph visible caterpillars at a distance that shows their size relative to a leaf. Include a second image showing their location on the shrub. If you find both smaller and larger caterpillars, document each rather than assuming they are alike.
Avoid relying on a blurry image or a glimpse of movement inside the foliage. A clear record gives you a better basis for comparing what you see during a later inspection.
Note Where Specks Collect
Look on lower leaves directly beneath damaged foliage, as well as along the edge of the planting bed. Nearby pavers or a concrete walkway may make dark material easier to notice.
Record the location along with the condition of the leaves above it. A few specks on a patio can come from several sources, so keep them in context with everything else you observe.
Measure How Much of the Plant Is Affected
You don't need to count every leaf. A consistent, simple estimate is enough to show whether the affected area is limited or widespread.
Start with one shrub at a time. For a hedge, divide the row into sections you can recognize later, such as the plants beside a gate, window, or corner of the house.
- Identify the affected areas. Note whether the changes appear on one branch, one side of the shrub, or throughout the canopy.
- Estimate the remaining foliage. Compare the amount of intact foliage with areas where leaves are thin or missing.
- Record visible caterpillars and specks. Note their location and approximate number without disturbing the whole plant.
- Photograph the result. Take one image of the entire shrub and closer images of representative branches.
- Date your notes. Use the same viewpoints when you inspect again.
The goal is a useful baseline, not a perfect count. For example, a note that one outer branch has several affected leaves is more useful than writing that the whole shrub "looks bad."
If several plants are involved, record them separately. One heavily affected shrub beside several full-looking plants calls for a closer comparison of each plant.
Separate Existing Damage From New Changes
Older-looking damage and newly noticed damage can appear on the same shrub. A single visit won't always tell you when a leaf changed, so use your first inspection as a starting point.
Take photos that include a recognizable feature, such as a fence post or the edge of a planter. On the next visit, stand in roughly the same place. Then compare the same branches instead of judging the shrub from memory.
Look for changes in the number of affected leaves and the size of the affected area. Also note whether caterpillars or dark specks are visible in the same locations.
A dated photo can be especially useful when the damage sits on the far side of a hedge. Without a record, it's easy to overlook that area during a routine walk through the yard.
Check Nearby Plants and Yard Surfaces
Inspect the other oleanders on your property, even when the first shrub has the most obvious damage. Note which plants have similar-looking leaves and which still appear full and intact.
Compare Oleanders in Different Locations
A shrub near the front entry may be easier to notice than one behind the pool or along a side fence. Give each planting a similar inspection, including the interior and lower foliage.
If the plants form a screen, record where the visible changes begin and end. That makes it easier to see whether the affected area is confined to one section of the hedge.
Keep Other Outdoor Work Separate
Leaf debris may collect on artificial turf, walkways, and patios beneath a shrub. During routine cleanup or paver cleaning, note where material has gathered before removing it. Its location can help you decide which branches deserve a closer look.
Keep those observations separate from work on the surfaces themselves. A planting-bed inspection answers a different question than a concrete repair or a drainage assessment.
Consider Other Changes You Can See
Missing leaf tissue is one part of the picture. Look at the whole shrub for discolored leaves, sparse sections, broken branches, or other changes that don't look like the areas you first noticed.
Also observe the surroundings. A damaged area beside a path or driveway may need a different explanation from one inside a protected hedge. Nearby irrigation and runoff patterns are worth recording if the plant shows broader changes.
Avoid assigning every problem in the yard to one cause. Your notes can distinguish the leaves with missing tissue from other conditions, such as discoloration or broken growth.
If the plant is hard to view because branches are crowded together, take photos of each accessible side. Record what you couldn't see as well. That distinction keeps an incomplete inspection from looking like a clean bill of health.
Plan the Next Inspection
Once you've documented the plant, choose a regular time to revisit the same spots. A quick look at the affected branches is useful, but repeat the wider walk around the shrub too.
Use Your Photos as a Reference
Open the original wide photo and compare it with the plant in front of you. Check the branches you documented, then look at surrounding foliage for changes you hadn't recorded.
Keep notes brief: the date, the affected area, and whether visible caterpillars or dark specks are present. Consistent observations are easier to compare than a long description written differently each time.
Fit the Inspection Into Yard Maintenance
Add the oleander check to the rest of your outdoor routine. Our Southwest Florida yard maintenance calendar can help you organize regular landscape tasks around the property.
At Outdoor Life Pros, we work with homeowners in Fort Myers, Cape Coral, Estero, and Bonita Springs on landscaping and outdoor spaces. A clear record of the affected plants helps keep any landscape discussion focused on what you've observed.
Keep a Clear Picture of the Damage
A useful inspection starts with the leaves, then expands to the rest of the shrub and nearby oleanders. Note the location and extent of each change, along with any caterpillars or dark specks you find.
Dated photos and consistent notes give you a practical way to compare the plant over time. They also keep one damaged branch in perspective with the condition of the whole landscape.